Archive for January, 2010

New Western Digital “Advanced Format” HDD partitioning scheme

Maybe I’m the only guy that didn’t hear about this, but when I did my post on “Make Your Own External Hard Drive” below, I stumbled upon Western Digital’s new “Advance Format” hard disk drives (HDDs).  In the Advanced Format HDD, Western Digital has replaced the previous 512 byte hard drive sector with a 4 kilobyte (4096B) hard drive sector.  The first drives out there now are the WD Green Caviar series (1TB, 1.5TB & 2TB).  All should have “EARS” in the drive model number (i.e., WD10EARS).

Now… why do you care?  There are some compatibility issues with Windows OS’s prior to Vista & Windows 7 (duh… like Windows XP).  In fact, it has issues on Vista & Win 7 if you use currently available disk partitioning/cloning software to copy to an Advanced Format HDD.  The disk imaging software companies (i.e., Acronis, Paragon, etc.) have yet to update their products to conform to the new 4K sector (but hopefully they soon will).

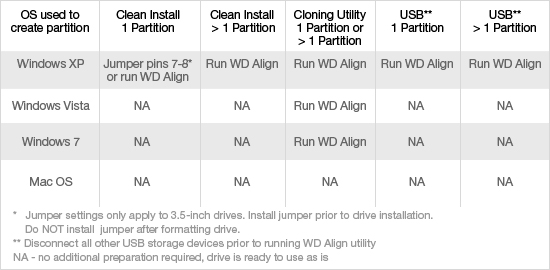
Fortunately, Western Digital provides alignment software that you can download from their website.  It is strongly recommended that you run this software after partitioning/formatting with Windows XP, or after using any disk partitioning/cloning software on Vista/Win 7.  In addition, the new Advanced Format HDDs have a jumper setting (pins 7-8) which you can use on XP when initially partitioning & formatting a new WD Advanced Format HDD (if you use the jumper setting, you DO NOT use the WD Alignment Utility).  Here’s the configuration details from Western Digital’s website:
WD-Align_chart_r2
So… what happens if you don’t follow the above procedures?  Well, supposedly you will not lose or corrupt any data, but you may drastically slow down the transfer speed of your new HDD.  Also, if you use the jumper pins 7-8 setting before partitioning/formatting the HDD, DO NOT run the Alignment Utility afterwards and DO NOT later remove the jumper (unless you’re completely starting over with the HDD… new partition, etc.).

Here’s links to information concerning the Western Digital’s Advanced Format HDDs:

UPDATE:  Ars Technica did an even more detailed article on this (“Why new hard disks might not be much fun for XP users”)

Western Digital currently offers two alignment utilities, one from Acronis & the other from Paragon.  The Acronis alignment utility is provided as a bootable ISO that you need to burn to a CD, whereas the Paragon utility is a Windows installer file.  Western Digital states the the Acronis utility may be as much as 3 times faster than the Paragon utility (I know which one I’ll be using!).

This is just one more reason you should build your own External HDD, as the WD Align Utility may not work on all USB Ext HDDs that are Advanced Format, requiring you to remove the HDD from the external enclosure, install it in your PC, and then run the WD Align Utility on it.  Well… it’s not always easy to crack open retail external hard drive cases to remove their HDD; but it’s trivial for an external HDD that you built yourself.

Why, you ask, should you build your own External HDD?

  1. Reliability/Quality.  Why do you want an Ext HDD?  To backup your data!  If the reliability of the Ext HDD you purchase isn’t as good as the system hardware from which you’re backing up, you’re wasting your time (& money).  In my opinion, retail External HDDs — especially the more affordable ones — are becoming increasingly unreliable.  Not only are the cases cheap, but the controller electronics, external connectors, power supplies, etc., are all of inferior quality.  The Seagate Free Agent Ext HDDs I mentioned in my previous post would get extremely warm… and this was when I wasn’t copying any files.  Heat is the enemy of most all computer components, especially HDDs.  Most of the external HDD enclosures available for building your own Ext HDD are often all metal (which is much better at dissipating heat than plastics) and often include cooling fans.  Keeping your HDD cool will noticeably increase the odds that it will survive many years of use.  I have also found the controller electronics, connectors & power supply to be of superior quality in separately purchased external enclosures.  If you read the customer reviews of many of popular retail External HDD products (i.e., Newegg), you’ll see a significant level of both failure and customer dissatisfaction.
  2. Data Recovery.  Should the HDD in your external enclosure fail, you have a better chance of recovering the data than with a retail Ext HDD, unless you’re willing to crack open the case of your retail Ext HDD & remove its HDD (which in almost all cases, voids your warranty).  You have fewer options for file/data recovery via USB than if you remove the HDD and connect it directly to your system (via motherboard IDE or SATA connectors).  Usually your only option is to download the Ext HDD manufacturer’s “disk tools” software, which in my experience “may” be able to restore the HDD to use, but is terrible at actually “recovering” any files.
  3. FlexibilitySay you decide to upgrade the HDD(s) in your desktop PC, i.e., removing your two 320GB HDDs and replacing them with two 1TB HDDs.  What do you do with these 320GB HDDs after they’re removed?  Well, if you have more space & connectors in your desktop PC, you could use them there.  But if you don’t, you can use these HDDs in another external enclosure for yet another Ext HDD, or if larger than your current Ext HDD so you could just replace it’s HDD with one of these.
  4. Disk Imaging Say you want to make a complete image of your system disk.  You first need a HDD of equal or greater size of the disk you want to image.  Next you need a means to connect the HDD to your system.  Again, if your desktop HDD bays are full or you don’t have any more motherboard HDD connectors, you can use your homemade Ext HDD.  Just remove the existing HDD from the Ext HDD Enclosure & install the HDD you want to place the image on, and go ahead and image your system disk with whatever software you choose (Acronis, Paragon, Ghost, DriveXML, etc.).  When through, you can remove the image HDD from the External HDD Enclosure & reinstall the previous HDD.

I cannot emphasize the importance of performing backups… that is, if you keep or have any data on your PC that feel you couldn’t live without or is important to you.  This might include photos, financial data, personal data, emails, music, videos, etc.  Murphy’s Law will ensure that the more important the data, the more likely a HDD will fail IF you don’t have at least one backup of that data.  I have not lost any data over the past 18 years, nor have I had a HDD fail on me (except for the three Seagate Ext HDDs mentioned in previous post).  In my experience, HDD failures almost ALWAYS occur — in both home & office environments — when you DON’T have current/multiple backups.  It’s like rain & umbrellas.  How many times have you brought an umbrella with you & not needed it?  How many times have you encountered rain when you DIDN’T have your umbrella?  For me, it’s about a 10:1 ratio (meaning I’ve encountered rain when I didn’t have my umbrella 10 times more often than when I had my umbrella with me).  Consider “backups” your safety umbrella.  You never seem to need them when you have them… but I can almost guarantee — if you don’t have a backup, you’ll eventually REALLY wish you had!

Make Your Own External Hard Drive(s)!

I’ve been buying off-the-shelf External Hard Disk Drives (HDDs) for the past seven years.  All have functioned perfectly and I’ve never had any issues (or data loss) — until I purchased three Seagate Free Agent Desk 1.5TB External HDDs last year – all from Costco’s.  Two of the three failed (after loading up with files, of course), so I put them back in their original packaging (after wiping them clean) & took them all back to Costco’s this past December & received a full refund.  (Thank You Costco for your fantastic return policy!)

I was thinking of making this post a slam against Seagate concerning their faulty Free Agent Desk Ext HDDs, but instead decided to encourage people to just build their own external HDDs.  It’s easy and doesn’t cost that much more than the retail products.  But in my opinion, you have a superior product and much greater flexibility.  Besides, it’s what I’m doing now & I thank Seagate for encouraging this behavior.

The discussion that follows only addresses 3.5″ hard drives.  You can build your own 2.5″ external HDD for even less, but you cannot yet get the higher capacity (i.e, 1TB) in 2.5″ HDDs yet.

You only need two things to build your own External Hard Drive:

  1. An enclosure (w/power supply & cables)
  2. A 3.5″ Hard Drive

I purchase all my computer hardware from Newegg.com, and they sell 3.5″ HDD external enclosures for as cheap as $17.  To replace my three Seagate 1.5TB Ext HDDs, I chose the Rosewill R2-JBOD Aluminum 3.5″ USB 2.0 Dual-Bay External Enclosure, on sale for $39.99 (currently out of stock until 2/16/10).  It’s main selling points for me were the all aluminum case; cooling fan; removable metal tray for two 3.5″ SATA HDDs; on/off power switch; separate fan on/off switch.  This case houses two HDDs and it’s almost the same size as the Western Digital MyBook enclosure (which only houses 1 HDD).

For the hard drives, I chose two Western Digital Caviar Green WD10EADS 1TB SATA 3.5″ internal hard drives.   They’re currently $84.99 each @ Newegg (currently out of stock).  I’ve always gone with Western Digital (for over 15 years) as I’ve never had one fail.  I’ve had four of these WD Green Caviar 1TB drives installed in two of my desktops for the past year & they’ve performed flawlessly.  (By the way, don’t confuse this HDD with Western Digital’s latest WD10EARS, which uses a new Advanced Format – 4K Sector Transition.  It will require special procedures you need to follow if using on Windows XP (or earlier) Microsoft OS’s.)

Once you have your enclosure & HDDs, you need to install the HDD(s) in the enclosure.  I’ve always found this easy to do, and it was especially so with the Rosewill dual-bay enclosure.  You slide each drive in & ensure the SATA connector is seated, then secure each HDD with the included 4 screws.  Once both HDDs are installed, you slide the tray back into the enclosure, secure with four screws, and your ready to go!  (By the way, you don’t have to install two HDDs in the Rosewill dual-bay enclosure.  You can install just one, and install an additional HDD later).

So… now you have your newly assembled External HDD.  What next?  If you installed a previously used HDD in your enclosure (i.e., it’s partitioned, formatted, & may or may not have data on it), just plug the puppy in – connect to your USB port – and your ready to go.  If you installed a brand new HDD in your enclosure, then you need to go through a few steps before Windows (any version) will see it.  Go ahead & plug in your ext HDD, connect to USB port, and power it up.

To use your new HDD, you’ll need to bring up the Windows Disk Management interface (unless you get a pop-up Wizard offering to guide you through the necessary steps).  For XP, right-click on “My Computer”; click on “Manage”; then click on “Disk Management” under Storage in the Computer Management window that pops up.  You can also access Disk Management via “Start ==> Run” & type “diskmgmt.msc” in the run window & click OK.

Once you’re in Disk Management, you need to do the following THREE things:

  1. Initialize the disk (only takes a few seconds)
  2. Partition the disk (one or more partitions, very quick)
  3. Format the disk (NTFS or FAT32; recommend NTFS; recommend Full Format & it will take a while.  1TB HDD takes a couple hours)

If you’re lucky, when you enter Disk Management you may be presented with a pop-up that the system has discovered a new disk, and it will walk you through the necessary steps.  If you do not get a pop-up, go back to Disk Management & scroll through the listed disks.  At the bottom you should see your newly attached external HDD.  With the Rosewill Dual-Bay Ext HDD, Disk Mgmt on my system showed two new HDDs.  If your new Ext HDD doesn’t show up, try clicking on the “Action” menu  (in Disk Mgmt) & select “Rescan Disks.”  As I mentioned at the beginning of this paragraph, on most XP systems I’ve always gotten a pop-up Wizard that steps you through initialization, partitioning & formatting of the new disk(s).  If you don’t get this wizard, just right-click on the new drive in Disk Mgmt & select initialize; right-click & select partition (I use just one partition for the entire drive, but to each their own).  Lastly, right-click on disk & select Format.  If you created multiple partitions on the ext HDD, you’ll need to format each one of them.  I always format my disks with NTFS, especially the large 1TB or greater HDDs.  Unless you have a need for FAT32, I’d use NTFS.

Once you’ve initialized, partitioned & formatted your new ext HDD, it should appear in Windows Explorer & you should be able to start using it.

If you run into problems (it happens), don’t forget to “Google” for help & by all means post a comment here & I’ll try to help.  I’ve attached the Rosewill Enclosure user manual (Rosewill R2-JBOD User Manual), as it shows in more detail the steps you take to initialize, partition & format new HDDs.

Good Luck!

GEORGE (THE GOOSE) IS GOING BYE-BYE!!!

A bit of good news today, which is nice, seeing as I lost one of my upper front teeth at the endodontist this past Tuesday.  (er, uh… I didn’t actually lose it… the endo-douche pulled it out)  Anywho’s… George, the big, mean goose that’s been terrorizing both me and my son for the past 8 years… is going to a NEW home!  Why, you might ask?  Well… he finally started attacking my wife, who is the proper ‘owner’ of all our pet farm animals (goats, chickens, guinea hens, etc.).  And when I say a new home, I really mean that.  George is going to a farm that has a single female goose.  George used to have a mate, but she died a few years ago.  Her death has nothing to do with his meanness… he became a vicious little shit when he was only a year old, and has only gotten worse over the past 7 years.  During most of that time George was sweet to my wife, and only directed his hostility toward everyone else (mainly me & my son).

Anyway’s… now I can freely roam about in our yard or barn without worrying about who’s trying to sneak up on me to bite the shit out of my leg.

G’bye George!  I won’t miss you!  NOT-ONE-SINGLE-BIT!!!  Have a great life & I hope the coyotes and/or foxes don’t get you!

(Actually… I lied.  I really don’t mind if the coyotes or foxes DO get you)

George (da goose)

A few of my pet peeves (& interests)

  • Intellectual Property (IP)
    • Watch out for ACTA (Anti-Counterfeiting Trade Agreement).  Don’t know what it is? Google it.
  • Copyright
    • From US Constitution: “To promote the Progress of Science and useful Arts, by securing for limited Times to Authors and Inventors the exclusive Right to their respective Writings and Discoveries.”  We’re WAY beyond “limited” now… it’s frakking ridiculous!
  • DRM
    • I don’t think so!  No.  Never Again.  Uh Uh No Way.  No.  No.  No.

I’ll have more later…

I’ve been meaning to do this for years…

It’s about time, too.  Of course, the fact that I just bought six new keyboards (3 mini, 2 compact, 1 regular) has given me the urge to type… and type… and type.  And I’m really sick of typing into a text editor & deleting the file when I’m through.  I think it would be MUCH more meaningful to type here & make other people sick, too.  No?  Oh well, I’m sure I’ll eventually get tired of these new keyboards and this blog will probably cease to exist.  Seeing as I’m probably the only person looking at it, I don’t suppose it will be missed.  (boo hoo, I’m soooooo depressed)

I’ll have you know that I also gave a great deal of thought & spent considerable time trying to come up with an interesting and/or intriguing tagline, but… I got nuttin’.  Maybe later…